Followers

Showing posts with label card. Show all posts

Sunday, August 4, 2024

Creations Scrapbook Centrale Creative Team project 2024-Aug-04

 Hi,

I am posting on the Creations Scrapbook Centrale fb group today for the challenge theme: Animals, optional color:  Green.


I made a birthday card for my cat loving niece.  The patterned paper from Stamperia (Create Happiness by Vicky Papaioannou - Welcome Home) is just perfect for my project.  

But I didn't want to just use a piece of pattern paper?!  So I cut out some of the areas and made them shaker window.  I added glossy accent to the Tulip flowers, and adhere a few hand cut images (from the same collection), plus a rub-on.

I also made a matching envelope by adding rub-on and a hand cut image on the flap.  Et voila!


The sentiment banner is from my stash, and there is no stamping on the outside of the card.

That's it for today.  Thanks for stopping by!


Saturday, June 15, 2024

Creations Scrapbook Centrale Creative Team Project 2024-Jun-15

 Hi,

I am sharing another shaped card today, this one is for the Creations Scrapbook Centrale FB group challenge.  Our June challenge, which is hosted by myself, is all about making a Shaped Card.  


I made this card for someone very dear to me, he cares a lot about the environment, and his favorite sport is Volleyball.  In the front basket of the bike, there are water bottles and bananas (his favorite fruit), and in the back basket, there's a volleyball (I die a round shape, and hand drew the lines and colored with alcohol markers), and a few olive branches (die from Poppy Stamps).

Here's a photo of the backside.


Other than the die set and stamp set shown in photo above, I've used these supplies:

Spellbinders Standard Circle (S4-114) nested die set
Versamark Watermark Ink Pad
WOW Gold Rich Super Fine embossing powder
Talored Expressions Today's Menu Clear Stamp set
Altenew Enamel Dots (Warm Grey)
Copic Markers (W1, Y02,Y15,Y17,E25,E35,B12)
Sakura Gelly Roll White Gel Pen


Wednesday, June 5, 2024

Creations Scrapbook Centrale Creative Team Project 2024-Jun-05

Hello, welcome back!

This is my second post of the day.  To see my first post keep scrolling or click here for the short cut. 

This post is all about shaped card as well, and it's for the Creations Scrapbook Centrale fb group challenge for June, the theme is: Shaped Card (any shape except square and/or rectangle), and the color option is Fushia/Hot Pink.

I used a set of oval nested die for the base of the project.  Well, to make an oval shaped card stand is rather difficult, so I made it into an easel card.


I had so much fun putting the flowers together for this card, and the dimensions are really nice.  Not a card you could send thru the regular snail mail!

Here's a few photos to explain the basic construction of the card.

step 1: cut two panel using largest die, one for back panel, one for easel connection.  Cut again with largest die, but with the corresponding decorative oval die.  On the easel connection piece, make a mountain fold at mid-point, and a valley fold 1/2 inch from top.

step 2: glue the 1/2 flap at top of base panel.

step 3: glue the card front piece to the bottom flap of the easel connection piece.  You could do this step after you complete the card front.  Or just attach another layer on top of the card front.

To complete my card, I decorated the front before attaching to the easel.  Also I die cut another oval, inked and attached to the card base.  Also make a 'stopper' using the two smallest dies; it is attached with foam adhesive.


Supplies used for my project shown in photos below:


So happy you stopped by, have a wonderful day!!


Wednesday, March 27, 2024

Creations Scrapbook Centrale Creative Team Project 2024-Mar-27

 Hi,

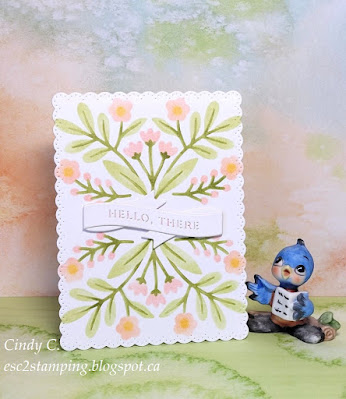
Today on Creation Scrapbook Centrale FB group, I share a softly stenciled card.  Our challenge theme this month is Spring/Easter and/or the color category: Pastel.

I used very soft pastel coloring scheme for the card.  


The stencil is from the Spellbinders 2022 Advent Calender (day 20), and the banner is also from the same calender (day 11).  The base base I die cut using Waffle Flower Lacy Layering Die.


And there is the matching envelope.


Supplies used for my cards shown in photos below (except the two advent calendar items):


There you have it, have a lovely day!!


Friday, March 8, 2024

A Little Sparkle

 Hi,

A quick share today.


I used the Lawn Fawn A Little Sparkle stamp and matching Lawn Cuts.  The cloud stencil is sort of a DIY item.  I used the cloud die from Spellbinders Hummingbird and Lily and a piece of semi-transparent plastic packaging and die cut my own mask/stencil.

And to keep up with my 2024 New Year Craft resolution, I made a matching envelope for it.


Supplies used shown in photos below:


I hope your day sparkles!


Tuesday, March 5, 2024

Pansies in An Envelope

 Hi,

I playing along two Inspiring challenge with this easel card.


Supplies:

Poppystamps Potpourri Flower Sie Set
Echo Park Glamour Stripe Stencil
Ranger Distress Inks (Spun Sugar, Picked Raspberry, Seedless Preserve, Peeled Paint)

Challenges:


Thanks for stopping by, have a lovely day!


Tuesday, February 27, 2024

Just For You

 Happy Tuesday!

I am playing along Altenew February 2024 Inspiration Challenge with this card.


The Pansies Layering Die Set gives you beautiful cuts and the key hole system makes it so easy to line up and assemble the flower.  The background is created using the Dotted Tile Debossing Cover Die.

Challenges:


Supplies used for my card:

Ranger Distress Ink (Squeezed Lemonade, Mustard Seed, Wild Honey, Crackling Campfire, Spun Sugar, Milled Lavender, Victorian Velvet, Picked Raspberry, Seedless Preserve, Old Paper, Shabby Shutter, Peeled Paint)
Memento Dye Ink (Tuxedo Black)


Thanks for stopping by, have a wonderful day!


Tuesday, July 11, 2023

Creative Scrapbook Centrale Team Project 2023-Jul-11

Hi,

It's my turn to post on Creation Scrapbook Centrale FB page today, and I am sharing another 'Garden' theme project.  I am inspired by the herbs in my garden, particularly this pretty editable flower: Naturtium.

I have created a multi-layered 3D card.


I stamped and colored Hero Arts Hero Florals Nasturtium three times.  Die cut them with Flowering Nasturtium Frame Cut and glued them onto three panels.  Top layer die cut with Arch die, middle layer die cut with Arch die and adhered with trellis die cut, and the bottom layer was just ink blended.


Here's a photo of my Nasturtium in my garden.


Other challenges:

(The Nasturtium has such bright and sunny colors)


Main supplies used for my project are photographed below:


Thanks so much for visiting.  Have a lovely day!


Wednesday, July 5, 2023

CAS Flower Challenge

 Hi,

It is always nice to use some extra pieces left over from another project to create a new one.  I have a left over stem of Lily of the Valley from my last project.  I die cut some leaves and colored with alcohol markers.  Then glue them onto a white card base that's been dry embossed with a cutting die.  I also cut the corners to add interest.  Added a sentiment strip et voila!


Challenges:

The Flower Challenge #82 - Clean & Simple


Supplies:

Memento Dye Ink (Tuxedo Black)
Copic Markers

Thanks for stopping by, I wish you a lovely day!


Birthday Shaker Card on Die Cut Divas

 Hello and welcome back to my blog.

Today I share an elegant and neutral birthday shaker card on Die Cut Divas Challenge Blog.  


The sentiment is gold heat embossed on a vellum panel, then it's attached to a pattern paper frame die cut using My Favorite Things A2 Stitched Rectangle STAX Set 2 Die-namics.  

Next I added foam adhesive all around the underside of the frame.  In the middle of a piece of black cardstock (trimmed to fit card base), I placed some gold and cream sequins, peeled off the backing of the foam adhesive, positioned and placed the frame over on top.  Then I attached the black panel (now with the shaker element) onto the white card base.

Actually this card came together rather quickly.  I hope you're inspired to create a birthday card or two, come over to Die Cut Divas and join in the challenge.  

Our sponsor this month is My Favorite Things.


Supplies:
Gold Embossing Powder
Verasamark Watermark Ink
Gold Sequins
Cream Sequins

Saturday, July 1, 2023

Birthday garlands on Die Cut Divas

 Happy July 1st!  To my fellow Canadian, Happy Canada Day!!

It's a day to celebrate birthdays, it's Canada's birthday, and also July is the birthday month of our July sponsor My Favorite Things on Die Cut Divas Challenge Blog.


And here's my card:

For my project, I used My Favorite Things CS-310 (Love Buds) and the matching die.  I stamped and color the flowers and branches in alcohol markers, then die cut.  Arrange them to form garlands on the card base (with strips of pattern paper already glued); and added a fish tail banner with the stamped sentiment.  It's not complicated at all.

Come join in our July Challenge at Die Cut Divas.  Our challenge theme: Birthday.  Challenge winner will receive a $25 gift card to their store.


Supplies:

My Favorite Things  CS-310 Love Buds Clear Stamp Set
My Favorite Things MFT-1346 Love Buds Die-namics
Copic Markers
Memento Dye Ink (Tuxedo Black)
Ranger Distress Ink (Vintage Photo)

Thanks for coming over, have a wonderful day!

Friday, April 1, 2022

All about texture on Poppystamps

 Hello there,

If you're looking for my Die Cut Divas post, please click Here.

I know it is April's Fool today, but there is no joke, I am tickled pink to be invited to be Guest Designer on Poppystamps today.

Poppystamps' challenge #91 is: Add Texture.  


Here's my project.


My project features Poppystamps' Bird House Pop-up Easel Die Set.  There many ways to add texture to a project, embossing paste, dry embossing, adding textured material, ...etc.  I chose to use corrugated cardboard to die cut the birdhouse, I added some paint to give it a good weathered look, and I also added some dyed cheesecloth at the bottom of the house.  On the roof, I added some distress embossing powder, you could see it in the close up photo below.


Adding textures to a card does not need to be complicated, you could simply do some torn edges, or distress the edges of the panels, add some splatters, or even adding layers to your project will make it 'texturized'.  Go ahead, make a textured project using Poppystamps products and join in the challenge.  Click here for the details.

Supplies:

Sizzix Creamy Acrylic Paint (Limoncello, Green Tea)
Copic Markers
Ranger Vintage Photo Distress Embossing Powder
Ranger Peeled Paint Distress Ink
VersaMarker Watermark Pen


Thank so much for stopping by.  Have a lovely day!


Wednesday, September 1, 2021

Teddy 5 on Die Cut Divas

 Hello,

Happy September 1st!!  I am sharing a sweet card on Die Cut Divas for our new challenge, Anything Goes.  Our sponsor this month is Morgan's Artworld.


My card features the very cute Teddy 5 digi stamp.

I colored it with Copic markers, die cut and framed.  I applied some Sprinkled Sugar Stickles on the cookies.


Supplies:

Hero Arts Scallpe Frame Cut
Copic Markers
Ranger Stickles (Sprinkled Sugar)


Thanks for stopping by.  Have a sweet day!