Followers

Showing posts with label Frantic Stampers. Show all posts

Monday, December 16, 2024

Fancy Edge on Die Cut Divas Takes Two

 Hello,

Welcome to my mid-December post, I am sharing another Fancy/Uneven Edge card on Die Cut Divas today.

It is not difficult achieve the result even if you do not have a border die, just do partial die cut.

I think the partial die cut gives a card some extra zink! 

I first stamped the Japanese Anemone image in black on the white card base.  Next I ink blended the images.  Then on scrap paper I die cut the floral image.  I use this die cut to mask the inked image, and spritzed with distress spritz to the background.  I applied some glamour glitter to the flower center.

Our sponsor this December is Frantic Stamper, they are offering two beautiful dies as the challenge prize.


Be sure to head to Die Cut Divas to check out our mid-December inspiration post.  And to link up, just click the "Monthly Challenge" button on the right sidebar.

See you in the challenge gallery!

Supplies used on my card:

Ranger Distress Ink (Squeezed Lemonade, Wild Honey, Crackling Campfire, Picked Raspberry, Peeled Paint, Uncharted Mariner)
Ranger Distress Spritz (Twisted Citron, Peeled Paint)
Memento Dye Ink (Tuxedo Black)
StudioLight - Art By Marlene Glamour Glitter (Gold)


Sunday, December 1, 2024

Fancy Edge on Die Cut Divas

 Hello there,

Happy December 1st!!  Welcome to a new challenge on Die Cut Divas Challenge Blog.  This month we challenge you to make a card with an Fancy/Uneven edge. 

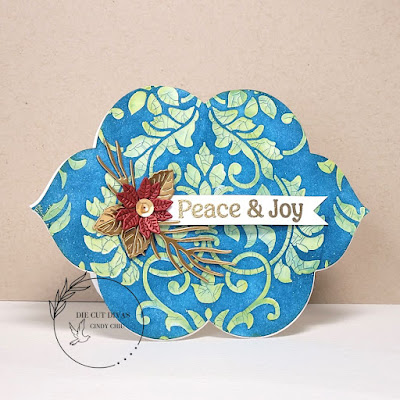
Here's my take:


I used Spellbinders Essential Floral Reflection Die set (available at Frantic Stamper) to cut my card base.  My card also features Frantic Stamper 6x6 Romantic Damask Stencil.  I first layered it on my card front, ink blended with Peeled Paint distress ink.  Once it dried, I layered the stencil on the card front at the same place, and applied a layer of Distress Crackle Paste.  Once that dried, I ink blended the background with Uncharted Mariner.

Then adhered a gold heat embossed sentiment, and embellished with gold foiled paper die cut pine branches and leaves, and red shimmery flower.

Supplies for first card:

Ranger Distress Crackle Paste (Translucent)
Ranger Distress Ink (Peeled Paint, Uncharted Mariner)
Versamark Watermark Ink
Gold Embossing Powder

I had so much fun making the first card, I went ahead and made a second one:


I used Elizabeth Craft Design Snowflake Border Die (available at Frantic Stamper) to make my Fancy/Uneven edge.   The Joy die is from 2023 Spellbinders' 12 Days of Stitchmas Kit.

I first die cut the intricate part of the die on my white card front, then I adhered a piece of glitter card stock behind it and sandwiched it with another piece of white cardstock to make sure it's strong.  I spritzed my card front with some Perfect Pearl, so it's not as boring.  

This card if full of sparkly goodness.  Here's a close up:


Frantic Stamper is our sponsor this month, and they generously offered two beautiful dies as the challenge prize.


Be sure to hop over to Die Cut Divas to see more inspiration projects and join in the challenge.  Do come back on the 15th to check our our mid-month inspiration post.

Supplies used for second card:

2023 Spellbinders 12 Days of Stitchmas Kit (day 8)
Sizzix Opulent Cardstock (665270)
Red Glitter cardstock (source unknown)
Ranger Perfect Pearl Pigment Powder Pearl

Thanks for stopping by.  Have a wonderful day!


Friday, May 5, 2023

Tic-Tac-Toe Challenge on Die Cut Divas

 Hi,

It's my turn to share another project on Die Cut Divas today.  Our May challenge is: Tic-Tac-Toe.


I chose middle row from left to right, Ribbon, "Love", and Heart.  And here's what I came up with.


I used Lawn Fawn Embroidery Hoop Die set currently available on Frantic Stamper, who is the sponsor for May challenge on Die Cut Divas.


On the embroidery die piece, I first cross stitched the word LOVE in red, then the rest of the heart shape in three tones of pink embroidery floss creating an ombre effect.  The embroidery rim was die cut three times and glue together.   The pattern paper from the What's Sewing On collection is the perfect background for my card.   And I added a ribbon bow on top of the hoop.

Be sure to check this blog post for further details, and I hope you're inspired to join in the fun!

Supplies:


Thanks for stopping by.  Have a lovely day!


Sunday, December 5, 2021

Tri-fold House Shape card on Die Cut Divas

Happy Sunday everyone!

Just twenty more days till Christmas, will you be home for the holiday? 

I am sharing a tri-fold House Shape card on Die Cut Divas today.  This project features the Elizabeth Crafts Design Winter Home Pocket Die set available at Frantic Stampers.  Instead of making a pocket for my art journal, I transformed the die into a tri-fold card.


The pattern paper I chose for my project is also from ECD, and I just love this one that looks like snow cover mountain top.  It's perfect to make it look like a winter village.

I painted the "sky" with white acrylic paint thru a homemade stencil, then added glitter for some shine.  The tress and houses are die cut from ECD Winter Home Pocket Die Set and Home Jungle Die Set.

For the inside of the card, I hung mistletoe and pine branches tied with bow, all die cut from Winter Home Pocket Die Set and ECD Leaves and Branches Die Set.  The sentiment is from Cas-ual Fridays Stamps and it is white heat embossed.

Here's a close up.


Our challenge theme this November is Winter/Christmas cards with option of Shaped Card.  Come over and join in the challenge.  Frantic Stampers is our Sponsor, and winner (residing in the U.S.) would receives a beautiful collection of dies.

Click here to see the details.

Supplies:

ECD Home Jungle Die Set
Versamark Watermark Ink Pad
White Embossing Powder


Thanks for stopping by, have a wonderful day!


Wednesday, December 1, 2021

Jar Shape Shaker Card on Die Cut Divas

 It's December, the holiday spirit is high!!  

I am sharing a shaped shaker Christmas card on Die Cut Divas today.  Our new challenge starts today and the theme is: Winter/Christmas (optional shaped Winter/Christmas card).

Our sponsor this month is Frantic Stamper.  

My project features the Elizabeth Craft Designs Mason Jar Snow Globe Special Kit still available at the store.


The original size of the mason jar is quite long, I partial die cut it so it would fit into an A2 size (4.25 x 5.5 inches) card envelope.

For easier mailing, I didn't use foam adhesive between the two acetate layers, just score tape.  It still shakes but the bits stay put more which I like because my snowflakes are suspended in mid-air!  Wink!

I hope to see you in our challenge gallery.  Hop over to the Die Cut Divas Challenge Blog to check out my teammates' beautiful inspirations and get the challenge detail.


Supplies:

Simon Says Stamps Inside Holiday Greetings Clear Stamp Set
Nuvo Glitter Drops - Gold Coast
Studio Katia Iridescent Magnolia Fusion Sequins
WOW Metallic God Rich Super Fine Embossing Powder
Versamark Watermark Ink Pad


So glad you stopped by, see you again soon!


Tuesday, October 1, 2019

Pumpkin 'Say Cheese' on DCD

Happy October 1st!

Ahh...That wonderful Fall foilage is happening here in the Northern hemisphere and the pumpkins are waiting to go to a new home!  :D   

A new challenge begins on Die Cut Divas today.  The theme is Fall or Fall Colors.  You can work with the wonderful Fall colors or any holidays in October - for Americans, it's Halloween, so work your FALL MAGIC.  The sponsor this month is Frantic Stampers.


Frantic Stamper has so much to offer, stencils, stamps and dies.  We want to showcase some of the products along our month-long journey through October.  Frantic Stamper carries their own brand as well as many other well known brands, such as Altenew and Elizabeth Craft Designs, and Hero Arts.

Now onto my card, I title it Pumpkin Selfie.


I really like how it turned out.  To create this card I started working on the background panel.  On a 8 x 6 inch multi media paper, I stamped the leaves with distress ink and watercolored in multiple layers until I was happy, then splattered some Glimmer Metallic Gold ink.

I trimmed a 4 x 5 1/4 inch panel out, then die cut the instant photo frame.  I didn't want to cover up too much of the background so I bronze embossed the pumpkin image on white vellum, and painted the pumpkin (on the back) with alcohol ink.  However this does not show up too much, so I fussy cut the pumpkin in white and glue to the back of the pumpkin.  Then glue the vellum behind the photo frame.  I added another layer of the photo frame to make it more sturdy.  The sentiment is stamped in Jet Black.  I glue the photo frame with foam adhesive to the watercolor panel, and the panel is attached to a white card base.

I took some photos while working on the background panel.  Let's take a look.


Remember to hop over to Die Cut Divas to check out more about the challenge and see the beautiful inspirations my teammates created.

Supplies:

Ranger Distress Ink (Antique Linen, Wild Honey, Squeezed Lemonade, Old Paper)
Ranger Alcohal Ink (Sunshine Yellow, Sunset Orange)
Watercolors
Versamark Watermark Ink
Ranger Archival Jet Black Ink
Bronze Embossing Powder
Hero Art Glimmer Metallic Gold Ink

Thanks for visiting.  Have a great start to October!